Do you know what format your hard drive is using?
What’s the difference between NTFS, APFS or Mac OS Extended? What does Journaled mean? Which file system should you use on a Mac? If you’ve asked any of these questions, this guide is for you.
This is your ultimate guide for file systems on a Mac, explaining the difference between each file system and what they’re good for. We’ll also go over how to quickly check what format your hard drives are currently using, as well as how to change from one file system to another.
Checking what file system your drive is using
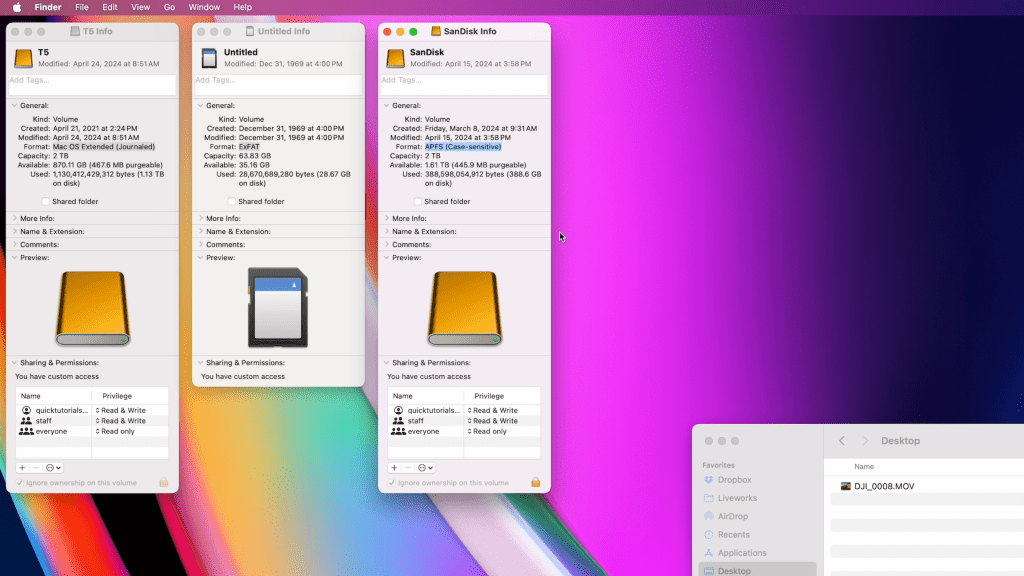
The easiest way to check your file system is to go to Finder, locate the hard drive you want to inspect and right-click and choose “Get Info”. A window opens showing the format of the drive. You can also use the keyboard shortcut Command + i to open these info windows.
Another way to check your drive’s file system is to launch Disk Utility. Disk Utility is located in your Applications folder, under the “Utilities” subfolder. With Disk Utility you’ll see the file format of any internal or external drive, and you can use it to erase or format your hard drives. Just make sure to back up all your important files first, because formatting a drive will always delete everything on the drive.
Which file system should I use?
If you’re using a Mac, there’s a few options you can choose from. I’ll break down the most common file systems below.
APFS – Apple File System
This is the default file system on any modern Mac. It’s optimized for SSD drives but can also be used on traditional hard drives. APFS can be used as a boot drive on macOS 10.13 and newer versions, and you can also use it on storage drives that are simply storing files and not running an operating system. APFS is a great format to use if you only work on a Mac, but it does not work on Windows computers. For cross-compatible drives, look into ExFAT instead.
When formatting a drive, you can choose from the following
- APFS
- APFS (Encrypted)
- APFS (Case-sensitive)
- APFS (Encrypted, Case-sensitive)
The encrypted option will allow you to encrypt the drive with a password. The case-sensitive format will treat files and folders with different letter casing as separate files. For example, normally two folders named “Quick Tutorials” and “QUICK TUTORIALS” would be conflicting since they share the same name, but on a case-sensitive drive they will be treated as two different folders with different names.
Mac OS Extended
This used to be the standard file system on older Macs, and it’s still the best choice if you’re running macOS 10.12 or older. It’s also worth noting that if you have external drives formatted to Mac OS Extended, they work with new Macs just fine.
With Mac OS Extended you’ll be able to choose from the following options
- Mac OS Extended (Journaled)
- Mac OS Extended (Journaled, Encrypted)
- Mac OS Extended (Case-sensitive, Journaled)
- Mac OS Extended (Case-sensitive, Journaled, Encrypted)
Just like with APFS, Encrypted options will protect your drive with a password, and making your drive case-sensitive will make your drive see files using uppercase vs. lowercase letters as separate names.
All Mac OS Extended versions are “Journaled”. This refers to a feature called journaling, which helps protect the file system from corruption caused by unexpected shutdowns, power failures, or system crashes. In other words, your computer is basically keeping a journal of any changes that are being made on your hard drive, and if your machine experiences an unexpected shutdown or power loss, that journal will help make sure your file system doesn’t get corrupted.
Windows-compatible formats: ExFAT, MS-DOS (FAT) and NTFS
If you need to use a drive with both Mac and Windows computers, you’ll want to choose a file system that’s supported in both environments.
The best option for cross-compatible use is ExFAT. It’s the modern file system that’s supported by macOS and Windows, and supports large file sizes. It’s the perfect file system for USB drives, thumb drives, SD-cards etc. MS-DOS (FAT) is another cross-compatible format, but it has a maximum file size limit of 4GB, which makes it useless for anyone working on large files.
NTFS, which is the default file system on Windows computers, has limited compatibility on Mac computers and usually allows read-only access. There are some 3rd party software options you can download to allow full read & write access to NTFS drives on a Mac, but for the easiest access and best compatibility, we recommend sticking to ExFAT instead.
Our favorite setup:
- Apple Magic Keyboard: https://amzn.to/486dCA0
- Apple Magic Mouse: https://amzn.to/3Um4CDy
- Laptop – MacBook Pro M3 Pro: https://amzn.to/43Bj7WG
- Desktop – Mac Mini M2 Pro: https://amzn.to/3TB1ul9
- Monitor – Apple Studio Display: https://amzn.to/49lAxrj
- 2TB SSD Hard drive: https://amzn.to/49trq86
When you purchase through links on our site, we may earn an affiliate commission at no extra cost to you. This helps us continue to create guides like this for our audience.

Leave a comment